Connecting an MCP server to the Slackbot MCP Client
The Slackbot MCP Client allows developers to connect remote MCP servers via HTTP to Slack. Once connected, Slackbot will automatically discover your MCP server's tools and invoke them based on user prompts in conversation.
You can add MCP server support via a Slack app, like any other Slack platform feature. Within this guide, you'll determine the proper authentication method for your MCP server, configure it within a Slack app, and then install said app to a workspace. By the end, you'll be able to invoke the tool from Slackbot.
Choosing the proper authentication method
Slack supports four authentication methods for MCP server requests. Choose the one that fits your use case and the MCP server you plan to use.
| Authentication method | Use | Per-user identity | Requires separate OAuth flow |
|---|---|---|---|
| No auth | Use when your MCP server serves the same responses regardless of who is asking. Users can start using tools immediately with no OAuth flow. | No | No |
| Slack identity auth | Use when your MCP server maps Slack user IDs and team IDs to available features. No separate OAuth flow is required for end users; Slack identifies them via signed requests containing their user and team IDs. | Yes (Slack user/team ID) | No |
| Dynamic Client Registration | Use when connecting to a third-party MCP server that supports DCR. You provide the URL and the server handles OAuth client registration automatically. | Yes (OAuth tokens) | Yes |
| Manual OAuth | Use when your MCP server doesn't support DCR. You define the authorization URL, token URL, scopes, and identity endpoint. When a user connects in Slackbot, Slack redirects them through the provider's OAuth flow using these credentials. | Yes (OAuth tokens) | Yes |
Adding the MCP server to your Slack app
You can configure your MCP server within App Settings or by editing the app manifest directly. If you add a server via App Settings, those settings are automatically added to the manifest.
- App Settings
- App manifest
-
Go to your app at api.slack.com/apps. If you don't already have one, create one by clicking Create New App.
-
In the left sidebar under Features, click MCP Servers.
-
Click the Get Started button to open the MCP Server form.
-
Fill in the following fields:
- Name: A display name for your MCP server.
- URL: The HTTPS endpoint of your MCP server (e.g.,
https://mcp.acme.com/mcp). - Auth Type: Select your desired authentication.
-
Complete any additional fields required by your selected auth type, then click Save. The fields depend on the auth type you chose:
- Slack identity
- No auth
- Dynamic Client Registration
- Manual OAuth
There are no additional fields. Slack identifies the user from signed requests.
There are no additional fields.
The server handles OAuth client registration automatically; you can provide some optional identity fields:
- Identity URL (optional): The endpoint Slack calls to fetch the user's identity after authentication.
- Account Identifier (optional): A JSONPath to the user identifier in the identity response, such as
$.id,$.email, or$.user.id.
If you plan to use Manual OAuth, register an OAuth client with your provider before you configure the server, so you have the client_id, client_secret, and endpoint URLs on hand.
The form collects the following OAuth provider values:
- Client ID and Client Secret: Your OAuth credentials from the provider. If you enable PKCE, the client secret is optional.
- Authorization URL: The endpoint that initiates the OAuth handshake and shows the consent screen.
- Token request URL: The endpoint Slack calls to exchange the authorization code for an access token.
- Use HTTP Basic Authentication: Enable to send client credentials via the HTTP Basic Auth header instead of the POST body.
- Use PKCE (Proof Key for Code Exchange): Enable if your provider requires PKCE.
- OAuth scopes (optional): The scopes to request during authorization. Press Enter to add each scope.
- Identity URL (optional): The endpoint Slack calls to fetch the user's identity after authentication.
- Account Identifier (optional): A JSONPath to the user identifier in the identity response, such as
$.id,$.email, or$.user.id. - HTTP method (optional): The HTTP method used to fetch the user identity. Defaults to
GET. - Custom headers (optional): Extra headers for the identity request. Slack sets the
Authorizationheader automatically.
Once saved, your MCP server appears in the MCP Server Connection Details table. You can add additional servers by clicking + Add MCP Server.
mcp:connect scope to your app.-
Go to your app at api.slack.com/apps. If you don't already have one, create one by clicking Create New App.
-
In the left sidebar under Features, click App Manifest.
-
The
mcp:connectbot scope is required for MCP server connectivity. Add it like so:
  "oauth_config": {
    "scopes": {
      "bot": ["mcp:connect"]
    }
  },
- You'll also need to add an
mcp_serversblock to your app manifest. Themcp_serversblock tells Slack where to find your MCP endpoint.
| Field | Required | Description |
|---|---|---|
url | Required | The HTTPS URL of your MCP server endpoint |
auth_type | Required | Authentication type. Can be "no_auth", "slack_identity_auth", "manual_auth", or "dynamic_client_registration" |
auth_provider_key | Conditional | Reference to an external_auth_providers entry for per-user OAuth. Required when auth_type is manual_auth. |
- Choose the auth type that fits your use case. The following are example manifests:
- Slack identity
- No auth
- Dynamic Client Registration
- Manual OAuth
The app needs users:read and users:read.email scopes to fetch profile data, plus a redirect_url for the app's own OAuth install flow.
{
  "display_information": {
    "name": "MCP Client - Slack ID",
    "description": "Connects app MCP server to Slackbot MCP client using Slack identity auth"
  },
  "features": {
    "bot_user": {
      "display_name": "MCP Client - Slack ID",
      "always_online": true
    }
  },
  "oauth_config": {
    "redirect_urls": [
      "https://1234-56-78-90-0.ngrok-free.app/slack/oauth_redirect"
    ],
    "scopes": {
      "bot": ["mcp:connect", "users:read", "users:read.email"]
    }
  },
  "settings": {
    "org_deploy_enabled": true,
    "socket_mode_enabled": false,
    "token_rotation_enabled": false
  },
  "mcp_servers": {
    "profile": {
      "url": "https://1234-56-78-90-0.ngrok-free.app/mcp",
      "auth_type": "slack_identity_auth"
    }
  }
}
{
  "display_information": {
    "name": "MCP Client - No Auth",
    "description": "Connects app MCP server to Slackbot MCP client without authentication"
  },
  "features": {
    "bot_user": {
      "display_name": "MCP Client - No Auth",
      "always_online": true
    }
  },
  "oauth_config": {
    "scopes": {
      "bot": ["mcp:connect"]
    }
  },
  "settings": {
    "org_deploy_enabled": true,
    "socket_mode_enabled": false,
    "token_rotation_enabled": false
  },
  "mcp_servers": {
    "dice": {
      "url": "https://1234-56-78-90-0.ngrok-free.app/mcp",
      "auth_type": "no_auth"
    }
  }
}
You don't need an external_auth_providers block because the MCP server advertises its own OAuth configuration.
{
  "display_information": {
    "name": "MCP Client - DCR",
    "description": "Connects Notion MCP server to Slackbot MCP client using Dynamic Client Registration"
  },
  "features": {
    "bot_user": {
      "display_name": "MCP Client - DCR",
      "always_online": true
    }
  },
  "oauth_config": {
    "scopes": {
      "bot": ["mcp:connect"]
    }
  },
  "settings": {
    "org_deploy_enabled": true,
    "socket_mode_enabled": false,
    "token_rotation_enabled": false
  },
  "mcp_servers": {
    "notion": {
      "url": "https://mcp.notion.com/mcp",
      "auth_provider_key": "mcp_dcr_notion",
      "auth_type": "dynamic_client_registration"
    }
  }
}
If you plan to use Manual OAuth, register an OAuth client with your provider before you configure the server, so you have the client_id, client_secret, and endpoint URLs on hand.
Define your OAuth provider under external_auth_providers.oauth2 and reference it from mcp_servers.{server_name}.auth_provider_key.
external_auth_providers fields
Providers are nested under a fixed oauth2 key, then under a provider key you choose (for example, mcp_github). That key must exactly match the server's auth_provider_key, cannot contain spaces or periods, and must be 100 characters or fewer. Renaming a key is treated as delete-and-recreate, which invalidates existing user tokens (changing an existing provider's client_id in place has the same effect).
The following fields sit at the provider level, relative to external_auth_providers.oauth2.{provider_key}.
| Field | Required | Description |
|---|---|---|
provider_type | Required | Set to CUSTOM. This is the only supported value. |
options | Required | An object holding the provider's OAuth configuration. See the fields below. |
The options object holds the OAuth configuration itself. Paths in the following table are relative to external_auth_providers.oauth2.{provider_key}.options.
| Field | Required | Description |
|---|---|---|
client_id | Required | Your OAuth client ID from the provider. When registering the client, set the redirect URI to https://oauth2.slack.com/external/auth/callback, where the provider sends users after they authorize. |
provider_name | Required | A human-readable name for the provider, shown to users (2 to 255 characters). |
scope | Required | An array of scopes to request from the provider (for example, ["repo"]). Use [] if your server handles scoping internally. |
authorization_url | Required | The provider's authorization endpoint (must be https://). Where Slack redirects users to authorize. |
token_url | Required | The provider's token endpoint, which is where Slack exchanges the authorization code for a token. Must begin with https://. |
identity_config | Conditional | An object that tells Slack how to identify the connected account, or null. Required for CUSTOM providers, but if your provider key starts with mcp_ you may set it to null to skip account mapping. |
identity_config.url | Conditional | Required when identity_config is set. The endpoint Slack calls to identify the connected account. Must begin with https://. |
identity_config.account_identifier | Conditional | Required when identity_config is set. A JSONPath that extracts a unique account identifier from the identity response (for example, $.login). |
identity_config.headers | Optional | Extra headers to send with the identity request. |
identity_config.body | Optional | Body parameters for the identity request, used only when http_method_type is POST. |
identity_config.http_method_type | Optional | Defaults to GET. The HTTP method for the identity request, which can be GET or POST. |
use_pkce | Optional | Defaults to false. Set to true if your provider requires PKCE. For mcp_-prefixed providers, enabling PKCE removes the need for a client secret. |
token_url_config.use_basic_auth_scheme | Optional | Defaults to false, which sends credentials via client_secret_post. Set to true if your token endpoint expects client_secret_basic. If unsure, check the provider's /.well-known/oauth-authorization-server response for token_endpoint_auth_methods_supported. |
client_secret is not a manifest field. Add it out of band with slack external-auth add-secret or through the MCP Servers section in App Settings. Providers with an mcp_ prefix that use PKCE don't need a client secret.
See the app manifest reference for the complete schema.
This example connects to GitHub's MCP server.
{
  "display_information": {
    "name": "MCP Client - External Auth",
    "description": "Connects GitHub MCP server to Slackbot MCP client using an external auth provider"
  },
  "features": {
    "bot_user": {
      "display_name": "MCP Client - External Auth",
      "always_online": true
    }
  },
  "oauth_config": {
    "scopes": {
      "bot": ["mcp:connect"]
    }
  },
  "settings": {
    "org_deploy_enabled": true,
    "socket_mode_enabled": false,
    "token_rotation_enabled": false
  },
  "external_auth_providers": {
    "oauth2": {
      "mcp_github": {
        "provider_type": "CUSTOM",
        "options": {
          "client_id": "YOUR_GITHUB_CLIENT_ID",
          "scope": ["repo"],
          "provider_name": "GitHub",
          "authorization_url": "https://github.com/login/oauth/authorize",
          "token_url": "https://github.com/login/oauth/access_token",
          "identity_config": {
            "url": "https://api.github.com/user",
            "account_identifier": "$.login"
          },
          "use_pkce": false,
          "token_url_config": {
            "use_basic_auth_scheme": false
          }
        }
      }
    }
  },
  "mcp_servers": {
    "github": {
      "url": "https://api.githubcopilot.com/mcp/",
      "auth_type": "manual_auth",
      "auth_provider_key": "mcp_github"
    }
  }
}
Refer to the app manifest reference for the full schema.
Register an OAuth client with your provider
If you're using Manual OAuth, register an OAuth client with your provider before you configure the server above. When registering, set the redirect URI to Slack's external auth callback endpoint:
https://oauth2.slack.com/external/auth/callback
This is where the provider sends users after they authorize. The provider then issues a client_id and client_secret for the client, which you supply when you configure the server. If your provider needs to identify Slack as a client during registration, Slack publishes a Client ID Metadata Document (CIMD) at:
https://slack.com/.well-known/oauth-client-metadata
When editing the manifest directly, the client_secret is not stored in the manifest. Add it separately through the MCP Servers section in App Settings or with the Slack CLI:
slack external-auth add-secret
If your provider uses PKCE (use_pkce: true) and your provider key starts with mcp_, no client secret is required.
Implementing your MCP server
The deprecated standalone HTTP+SSE transport and stdio are not supported. SSE-formatted responses within Streamable HTTP are supported and expected.
How you implement your MCP server will depend on the type of authentication your MCP server is using.
- Slack identity
- No auth
- Dynamic Client Registration
- Manual OAuth
Using Slack identity auth
View the full examples: JavaScript | Python
In this example, three things happen on each request:
- The
/mcproute verifies the Slack request signature. - The tool reads the caller's identity from
_meta.slack(provided automatically by Slack). - The bot token from the installation store calls the
users.infoAPI method.
The _meta.slack identity fields
When a tool is called through Slack identity auth, Slack attaches the caller's identity to the request under the _meta.slack object, nested inside the JSON-RPC request's params. These fields let your MCP server identify who is calling without requiring a separate OAuth flow. Read them from the _meta argument that Slack passes to your tool handler.
A tools/call request from a standalone workspace looks like this:
{
  "jsonrpc": "2.0",
  "id": 1,
  "method": "tools/call",
  "params": {
    "name": "get_profile_card",
    "arguments": {
      "user_id": "U0101010101"
    },
    "_meta": {
      "slack": {
        "user_id": "U01234ABCDE",
        "team_id": "T01234ABCDE",
        "enterprise_id": null
      }
    }
  }
}
| Field | Type | Description |
|---|---|---|
user_id | string | The ID of the Slack user who invoked the tool. Pass it to the users.info method to look up profile data. |
team_id | string or null | The workspace ID for a standalone workspace. The value will be null for an Enterprise org user, unless the tool call resolves to a specific workspace where the app is installed. |
enterprise_id | string or null | The org ID for an Enterprise org user. The value will be null for a standalone workspace. |
All three keys are always present in the object, but team_id and enterprise_id can be null. The combination tells you where the request came from:
| Scenario | user_id | team_id | enterprise_id |
|---|---|---|---|
| Standalone workspace | U01234ABCDE | T01234ABCDE | null |
| Enterprise org, resolved to a workspace | U01234ABCDE | T01234ABCDE | E01234ABCDE |
| Enterprise org, not resolved to a workspace | U01234ABCDE | null | E01234ABCDE |
Verify the request signature before trusting anything in _meta.slack. The field is ordinary request JSON and can be forged by any caller that reaches your endpoint, so its contents mean nothing until you've verified the X-Slack-Signature header. Once verified, read user_id and handle a null team_id when building the installation lookup. Slack attaches _meta.slack for all auth types so its presence alone tells you nothing about how the request was authenticated.
- JavaScript
- Python
src/app.js
loading...
Entry point
Start the server on the configured port. The Bolt app handles OAuth install and redirect routes alongside your MCP endpoint.app.js
src/app.py
loading...
Entry point
Start the server on the configured port. The Bolt app handles OAuth install and redirect routes alongside your MCP endpoint.app.py
Setup
-
Expose your local server with ngrok. Update the
urlin your manifest with the generated URL.ngrok http 3000 -
Install the app:
- Go to App Settings.
- Navigate to OAuth & Permissions > Install to Workspace (or Install to Organization for Enterprise).
- Authorize the app.
-
Update environment variables with values from App Settings.
The signing secret verifies that incoming requests originated from Slack. The state secret secures the OAuth install flow.
ai/slackbot-mcp-client/slack-identity/.env.exampleloading...slack env init -
Start the app:
slack run
Using no auth
View the full examples: JavaScript | Python
Slack will send unauthenticated requests to your MCP server. Slack still signs every request so your server can verify it originated from Slack.
In this example, the /mcp route verifies the Slack request signature before forwarding the request to the MCP transport.
- JavaScript
- Python
src/app.js
loading...
Entry point
Bolt handles the Slack events route automatically, while the custom /mcp route serves your MCP server.app.js
src/app.py
loading...
Entry point
Bolt handles the Slack events route automatically, while the custom /mcp route serves your MCP server.app.py
Setup
-
Expose your local server with ngrok. Update the
urlin your manifest with the generated URL.ngrok http 3000 -
Install the app:
- Go to App Settings.
- Navigate to OAuth & Permissions > Install to Workspace (or Install to Organization for Enterprise).
- Authorize the app.
-
From App Settings, get the signing secret.
-
Set the signing secret as an environment variable:
slack app settingsslack env set SLACK_SIGNING_SECRET placeholder -
Start the app:
slack run
When using Slackbot, you can ask for things like "Roll 2d20".
Using Dynamic Client Registration
With DCR, the MCP server registers Slack as a client automatically, so there's no redirect URI to configure by hand.
Setup
- Install the app:
- Go to App Settings.
- Navigate to OAuth & Permissions > Install to Workspace (or Install to Organization for Enterprise).
- Authorize the app.
When a user connects to this MCP server in Slackbot, they'll be redirected to the provider's OAuth consent screen to authorize access.
If you created your MCP server via App Settings with Dynamic Client Registration, only the identity URL and account identifier fields are editable in the UI. To change any other configuration, edit the app manifest directly.
Using manual OAuth
Use manual OAuth when your MCP server doesn't support DCR. You supply the OAuth details yourself:
- a client ID and secret,
- the authorization and token endpoints,
- and an identity endpoint.
Slack uses those details to run the OAuth flow on the user's behalf when they connect your server in Slackbot.
You should have already registered an OAuth client with your provider and configured it when you added the MCP server. Now you can install and verify the app.
1. Install the app
- Go to App Settings.
- Navigate to OAuth & Permissions > Install to Workspace.
- Authorize the app.
2. Verify the authentication flow
Connect the server in Slackbot as described under Using Slackbot. When you connect, Slack will redirect you to the provider's OAuth consent screen. After you authorize, Slackbot should be able to list and call the server's tools. If the connection fails, see OAuth troubleshooting below.
OAuth troubleshooting
"Unexpected error" on authorize page
This error is caused by a Redirect URI mismatch. Ensure the redirect URI registered with your OAuth provider matches https://oauth2.slack.com/external/auth/callback.
access_token_exchange_failed error
This error is caused by a token endpoint auth method mismatch. Check that use_basic_auth_scheme matches your provider's expected method.
"Not able to connect this account"
This error is caused by a missing or wrong client secret. Re-add the client secret via the MCP Servers section in App Settings or using slack external-auth add-secret.
If your MCP server doesn't return a result within 60 seconds, Slackbot aborts the call and surfaces an error to the user.
Using Slackbot
-
Open a DM with Slackbot.
-
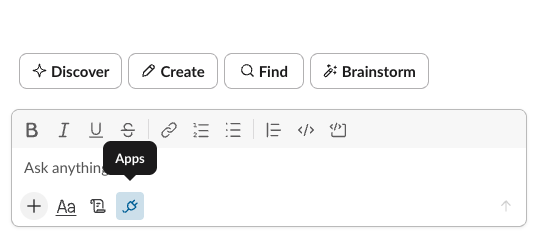
Click the Apps button in the Slackbot toolbar.
-
On first use, a list of suggested apps appears. Click the + button next to the app to add it. Users can have up to 5 active MCP servers at a time.
-
If using OAuth, you will be redirected to authorize with the partner's platform.
-
Once connected, the app appears under Your apps in the Integrations tab with a Manage button.
Check if Slackbot detects your tool
Ask Slackbot a question that maps to one of your tools:
What tools are available from Acme?
Slackbot will query your MCP server's tool definitions and list all available tools with descriptions.
You can also verify your tools by clicking Manage next to your app in the Integrations tab to view the list of available tools and their associated permissions.
Have Slackbot use a tool
Try a natural language prompt:
Show me recent activity on my Acme account
Slackbot will select the appropriate tool. If the tool is from a third-party, the user must explicitly authorize each tool call, both read and write, before Slackbot executes it.
When Slackbot invokes a tool, users are presented with the following options:
- Allow once: permits this tool call one time.
- Always allow: permits all future calls to this tool without prompting.
- Deny: blocks this tool call.
Users can view and update their tool permissions at any time in the MCP config dialog. After making a selection, Slackbot will then invoke the tool and return the results.
You can report responses with hallucinated information by clicking the thumbs down button. Then check the boxes next to the issues you want to report, and include the messages in your conversation if you’d like. We’ll always receive the last message you sent to Slackbot as part of a report. These reports help us identify patterns and improve Slackbot.
Enrich your tool responses
By default, tool results appear as plain text. To create a more polished experience, your MCP server can return rich responses using Block Kit for native Slack layouts or interactive HTML/JS via MCP Apps.
Troubleshooting
Viewing logs
You can view debug logs for your MCP server connections and tool calls via App Settings. In the left sidebar under Features, click MCP Servers, then select the Logs tab. The logs only include activity from app collaborators.
MCP connector not appearing in Slackbot
Check the following:
- the app has
mcp:connectin its bot scopes. - the MCP server is configured via an app manifest or App Settings.
Then try reinstalling the app after making any changes. On an Enterprise org, an org-level installation isn't required, but it can be useful when you want the app available across all workspaces in the org rather than installed workspace by workspace.
Slackbot failed to load tools
Your MCP server may be rejecting authentication. If your app is using OAuth, ensure the user has completed the authorization flow.
You can also test your MCP endpoint directly:
curl -X POST \
  -H "Content-Type: application/json" \
  -H "Authorization: Bearer TOKEN" \
  -d '{
    "jsonrpc": "2.0",
    "id": 1,
    "method": "initialize",
    "params": {
      "protocolVersion": "2024-11-05",
      "capabilities": {},
      "clientInfo": {"name": "test", "version": "1.0"}
    }
  }' \
  https://mcp.acme.com/mcp
Slackbot discovers but does not invoke tools
The tools may be unclassified and default to write classification. Ensure your tools include proper descriptions and classification metadata so that read-only tools execute without additional unnecessary confirmation prompts.
The invalid_client error
After connecting an MCP server that supports Dynamic Client Registration (DCR), Slackbot may return an invalid_client error when calling the server. This can happen when the remote MCP server no longer recognizes the client_id that Slackbot registered with it. This typically happens when a self-hosted server stores OAuth client registrations and tokens only in memory. A server restart wipes that registration, so any client_id issued before the restart becomes invalid.
Disconnecting and reconnecting the MCP server in Slackbot does not force a new client registration. It retries the OAuth flow using the same client_id as before. If the server still doesn't recognize it, the error will persist, making the issue look intermittent. It may "resolve" on a retry only if the
underlying token/session happens to still be valid.
To force re-registration, edit the MCP server connection and change the server URL (even temporarily), then save. Slackbot only performs a fresh client registration when the server URL changes; reusing the identical URL always reuses the existing client_id.
We recommend persisting OAuth client registrations and tokens to durable storage rather than memory only, so a server restart doesn't invalidate client_ids that Slack clients (including Slackbot) are still using.
OAuth errors
If using manual OAuth, see the manual OAuth troubleshooting section above.
Onward
By following along, you'll have an app that connects an MCP server to Slackbot for your users to interact with. But there's always more!
✨ To have visually graceful, interactive experiences, check out returning rich responses.
✨ To set up workspace controls, check out admin approval to manage how users install and access your app.
✨ To publish your app, check out distributing the app on the Slack Marketplace.